Close packed Garnet crystal
Make some close-packed Rhombic Dodecahedra
To make this model you will need:
- A printer
- Some method of cutting out paper or thin card
- Quick-drying paper glue
- An Acrobat PDF reader
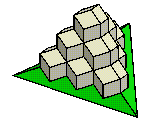
This picture shows a stack of rhombic dodecahedra. They close-pack, i.e.
they fit together with no gaps between them; here they are arranged to show
how they fit in threes:
1 at the top lying in a set of
3 which sit
in a set of
6.
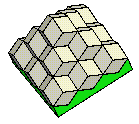
This picture shows the same rhombic dodecahedra but here they are arranged
to show how they fit in fours:
1 at the top lying in a set of
4 which
sit in a set of
9.
To make these models, download the PDF
(20K); then follow the directions below to make the models.
- First decide how many dodecahedra you want to make. The models above
need:
1+3+6 = 10 for the 3-fold model;
1+4+9 = 14 for the 4-fold model but you do not need to have them both built
up at the same time so 14 are enough.
- Print the page 1 of the PDF file so that you can see how to
construct the models.
- Print the other 5 pages ( 2 - 6) onto stiff paper (we use
160 gm weight). The dodecahedra are printed 4-at-a-time on page 2
so you will need to print this 4 times on the same
coloured paper. If possible print the 4 sheets containing the bases,
pages 3-6 onto different coloured paper to show off the
models better.
- Do not scale the individual pages. They must all be
the same scale to fit together correctly. We have made the bases a little
bigger to allow for the thickness of the stiff paper.
- You may find it more interesting to make the models in stages;
for eaxample
first make 4 dodecahedra and then make a base to see how they fit in; next
make enough dodecahedra to finish this model etc.
- Cut out all the nets with scissors or a modelling knife around the
outside solid lines.
- Score along the internal solid and dashed lines with a compass point
and a ruler.
- First make a dodecahedron; the one on the left of the cut-out sheet has
been numbered but the numbers should be inside the finished model and will
not show.
Notice that the rhombus at the top (12) of each 'cut-out' does not have any
tabs; this should be the last one to glue.
Bend up the card along all lines.
Start at the bottom and glue the 3 rhombi (1, 2 & 3) together with the tab
'c' stuck to the top of face 1. In this way the outside will not show the
tab nor the ink of the lettering or lines.
Now continue up the chain of rhombi:
- add faces 4 & 5 making a 3-fold vertex with tab d
- add face 6 making a 4-fold vertex with tab g
- add face 7 making a 3-fold vertex with tab h
- add face 8 making a 4-fold vertex with tab f
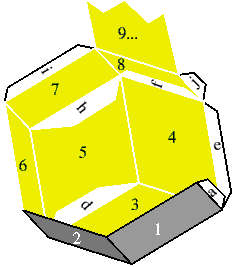
Your model should look like this just before gluing face 9
to face 7 with tab i. The inside is coloured yellow and the tabs white.
- add face 9 making a 3-fold vertex with tab i
- add face 10 making a 4-fold vertex with tab k
- and a 3-fold vertex with tab b
- add face 11 making a 4-fold vertex with tab m
- and a 3-fold vertex with tab l
- finally glue face 12 down onto tabs a, e & j making two more 3-fold
and two more 4-fold vertices
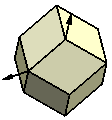
Here is your finished model. This figure shows a 3-fold and
a 4-fold symmetry axis. Which is which?
- the 3-fold base is the smaller one having only 9 dimples so make this
first, referring to the 'page1' to see what it should look
like.
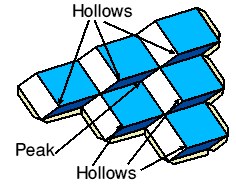
There are 6 hollows with 3 faces each, 3 cross-over points
with 6 faces each and a peak in the middle with 3 faces.
After you have cut out and scored the model from page 3,
identify these features and glue up the triangular base making sure that:
- the dotted lines bend down (you're making the base upside down so as
not to show the guide lines);
- the solid lines (mostly on tabs) bend up;
- you stick the tabs onto the side with the guide lines so they don't show
on the top.
Next glue on the surround for the base from page 4; each of
the 3 sides glues on to 6 tabs and finally glue the triangular base onto the
sides.
- make the 4-fold base similarly from pieces on page 5.
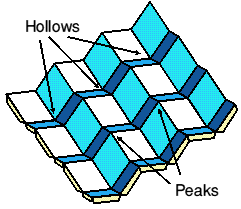
There are 9 hollows with 4 faces each, 10 cross-over points
with 4 faces and 4 peaks with 4 faces.
Glue on the surround for the base from page 6; each of
the 4 sides glues on to 6 tabs and finally glue the square base onto the
sides.
Click here to see more models to make
Page last updated 24 November 2001
BCA Home page WebMaster
[email protected]
 Click here to return to BCA homepage


 Click here to return to BCA homepage